Avaya IP Office 500 v2 Phone Systems

The Avaya IP Office 500 V2 Phone System is the Number 1 small-medium business solution in the world. If you're after a great solution then Avaya IP Office v2 simply has to be on your short list. Hailing from the USA, the Avaya IP Office 500 V2 model is also aggressively priced delivering incredible value, reliability and cost saving features whether you're a small business or a large multinational.

Avaya Quick help

Need help on how to use your Avaya Telephone System? below you will find a lint of frequently used items on your phone system, feel free to browse all items and contact us if you need any further assistance with your Avaya PABX..

Feel free to browse all items here and please contact us if you have any other questions on how to use your Avaya system.

Total Solutions IT are Albury Wodonga Local V-Express partner and so are qualified to help you with your Avaya IP Office Phone System

Avaya Help is always just a phone call away 02 6061 4222.

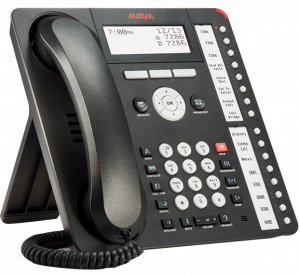
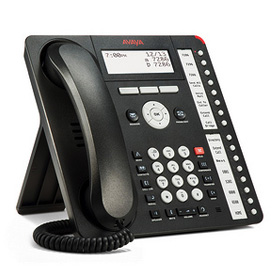
Avaya 1416 help

Interested in Voicemail to Email? – Ask us about Microsoft 365 Intergration

FAQ’s

Updating your Phone System Greetings & Voicemail

Updating Avaya Phone Systems Greetings

These steps to update the phone systems greeting apply to all Avaya systems including the Avaya IP Office 500.

To change the night message on an Avaya follow the steps below:

  1. Dial access code for mailbox that you are recording
  2. Enter your password
  3. Dial “3” to go into setup options
  4. Dial “2” to start recording
  5. Dial “2” to stop recording
  6. Dial “1” to listen to and verify that you are happy with your recording
  7. Dial “3” to save your recording or Dial “4” to save your recording on an endless loop that does not allow  a  message to be left by incoming callers.

***NOTE: These the above is the common way of updating messages, however Avaya phone systems can be heavily customised so these may not work for you. If you don’t know your access code or get stuck, please Call us on 02 6061 4222.***

Updating Avaya Phone Systems Greetings

These steps to update the phone systems incoming call prompts apply to all Avaya systems including the Avaya IP Office 500.

To change the incoming call message on an Avaya follow the steps below:

1. To setup first message dial *91(hunt group ext) and follow the prompts to record and save the message.
2. To setup second message dial *92(hunt group ext) and follow the prompts to record and save the message.
3. Under the hunt group you wish to apply the prompts on,
open the announcements tab and configure the setting to however you desire.

***NOTE: These the above is the common way of updating messages, however Avaya phone systems can be heavily customised so these may not work for you. If you don’t know your access code or get stuck, please Call us on 02 6061 4222.***

To change the call routing on your IP Office PABX

– For after hours calls be to routed to your message bank press the “Night 1” button

– For public holidays press the “Night 2” button, this will then route calls to your holidays message

If you would like to have your Avaya IP Office switch over to a holiday message automatically ask us for a demonstration on how to program your system to use a call schedule.

If you need more then the default two night switch messages please let us know.

If you wish to have all calls divert to an external number

– Select “Features” button

– Scroll down to “Forward”

– “Follow me to” Divert all calls to another internal extension

– “Follow me here” divert call from another extension to your extension

– “Forward Unconditional” Divert call to external number

– Enter number and select “All Calls”

– Select “Done”

– Select “Features” softkey

– Scroll Down to “Phone User”

-Scroll Down to “Self Administer”

– Enter Security Code or login code

– Scroll Down to “Abbreviated Dial”

– Enter number you with to assign to button

– Push the physical button you wish to assign the number to

–  Select back to exit menu

– Select “Menu”

– Select “Personal Ringing”

– Select appropriate pattern

– Select “Save” button

– Select “Features” softkey

– Scroll Down to “Phone User”

-Scroll Down to “Self Administer”

– Enter Security Code or login code

– Scroll Down to “User BLF”

– Enter “user” number or extension number

– Push button you want the extension number assigned to

– Select “Features” softkey

– Scroll Down to “Phone User”

-Scroll Down to “Self Administer”

– Enter Security Code or login code

– Scroll Down to “Send All Calls”

– Press the button you wish to use

– Select “Features” button on handset

– Scroll down to “Call Settings”

– Select “Do Not Disturb”

– Select “Clear” button

Avaya 1416 General Usage

1. Press the CONTACTS button.

2. Scroll up or down to select the person or number you want to call.

3. Press the OK button or the call soft key.

1. Press the CONTACTS button

2. Press the More soft key.

3 Press the New soft key.

4. Enter the name using the dial pad. To enter characters using the dial pad:
a. Repeatedly press the number key that corresponds to the letter or number you want to enter until the
letter or number is displayed.
b. Pause before entering the next characters if the characters are on the same key.
c. To enter a space, press 0.
d. Enter remaining letters or numbers.
e. Press the Bksp soft key to delete the last character.

5. Press the OK button or the OK soft key.

6. Enter the telephone number.

7. Press the Save soft key or the OK button.

1. Press the CONTACTS button.
2. Scroll to the contact you want to edit.
3. Press the Details soft key.
4. Press the Edit soft key.
5. Scroll up or down to choose the field you want to edit.
6. Use the dial pad and soft keys to make changes to the contact information.
7. Press the Save soft key or the OK button to save your changes.

Answering a Call

  • If you are not already on a call, lift the handset. If you are already on a call, press the alerting call
    appearance button (slow flashing green lamp) puts the existing call on hold and answers the
    alerting call
  • To answer the call on speakerphone, press the SPEAKER button.
  • To answer the call using a headset, press the HEADSET button.

1. Dial the number you want to call.

2. When answered, either lift the handset or continue on speakerphone.

1. While connected to the call, press HOLD

2. To resume the call, press the call appearance for the held call (fast flashing green lamp).

1. While connected to the call you want to transfer, press TRANSFER.

2. Dial the telephone number

3. Press TRANSFER again to complete the transfer.

Call handling
Adjusting the call volume
While on a call, you can adjust the volume of an incoming call. The volume is adjusted separately for the device, that is,
handset, headset or speaker, that you are currently using.
1.Press the VOLUME key.
2.Use the plus key (+) and the minus key (-) to adjust the volume.
Muting a call
To ensure that a caller cannot hear you, place the telephone on mute. However you can still hear the caller. The mute
setting remains active even if you switch between calls using hold or appearance buttons. If you change the listening
mode, for example, from the handset to the speaker, the mute setting is canceled.
1.To activate mute, press the MUTE key. The button will be lit while mute is active.
2.To switch mute off, press the MUTE key again.
Ending a call
· Use the Drop key to end the current call.
· Press the SPEAKER key to end the current call that is on the speaker mode.
· Press the HEADSET key to end the current call that is on the headset mode.
· Replace the handset to end the current call that is on the handset mode.

Starting a conference
Press the CONFERENCE key to start a conference with all the connected calls and calls placed on hold.
Alternatively, to start a conference or to add another party to a conference:
1.Press the CONFERENCE key. The telephone system automatically places the current call on hold.
2.Dial the number of the person that you want to add to the conference.
3.Press the CONFERENCE key again, or press the Join soft key after the call is answered and the person would like
to join the conference.
4.Press Drop key and then press the appearance key of the held call if the call is not answered.
Dropping/Muting
1.While in the conference, press the DROP key, the details menu appears. Scroll through the list of callers in the
conference and:
· To drop a caller from the conference, highlight the call and press Drop.
· To mute a caller, highlight the call and press Mute. Repeat this to unmute.
· To return to the call display, press the Exit soft key.

Transferring calls
To transfer a call, your telephone must have an available call appearance button. If all the call appearance buttons are in
use, end or park one of the existing calls.
1.Press the TRANSFER key. The telephone system automatically places the current call on hold.
2.Dial the number to which you want to transfer the call. Alternatively, press Dir to select a destination from the
directory.
· To complete the transfer, press the TRANSFER key or press the Complete soft key while the call is still
ringing or after it is answered.
· If the transfer destination does not answer or does not want to accept the call, press Cancel.
Transfering to voicemail
You can use the Message key to transfer a call to another user or to the voicemail mailbox of a group.
1.When connected to a call, press the Message key. You can still continue talking.
2.Dial the extension number of the user or group and press Select.

Redirecting calls
Do Not Disturb
When you select Do Not Disturb, the calls are redirected to voicemail if available, otherwise, you hear a busy tone. Calls
to any group of which you are a member are not presented to you. You can still use the telephone to make outgoing
calls. When you go off-hook, you hear a broken dial tone.
1.Press Features. Use the up and down arrow keys to highlight Call Settings. Press Select.
2.Use the left and right arrow keys to change the setting or use the indicated soft key.
Forward Unconditional
Use the Status menu to change the forward unconditional settings.
1. Press the Status soft key, if shown. To access the status menu during a call, press the PHONE key and then press
the Status soft key, if shown.
2.Use the Up and Down arrow keys to scroll the menu to Fwd Uncon.
· To switch off forward unconditional, press the Off soft key.
· To change the forwarding settings, press the Edit soft key. Use the Up and Down arrow keys to scroll through
the editing options.
§ Use the left and right arrow keys to switch the forwarding on or off.
§ Use the left and right arrow to select which calls should be forwarded. The options are External Only
, External and Group, Non Group Calls and All Calls.
§ Select Edit to change the number to which calls are forwarded.
Follow Me
You can redirect your calls temporarily to another extension.
1.Press Features. Use the up and down arrow keys to highlight Forward. Press Select.
2.Use the up and down arrow keys to highlight Follow me To. Press Select.
3. Dial the number of another user. When the number matches the user, the name appears. Alternatively, use the
Dir soft key to select a user from the directory.
· Save
Save the selected number as the follow me to destination. All calls to your extension number will be
redirected to that destination.
· Clear
Clear the currently selected or set number.
· Back
Go back to the previous menu.

Contacts
Adding a new contact
You can add up to 100 personal directory contacts.
1.Press the CONTACTS key. Use the left and right arrow keys to select your Personal directory.
2.To add a contact, press New. To edit a contact, highlight the contact and press Edit.
· Use the up and down arrow keys to switch between number and name entries.
· After you enter the required name and number, press Save.
Add a contact from the call history
You can add a name and number shown in your call history to your personal contacts.
1.Press the CALL LOG button. Use the left and right arrow keys to select the call types: All, Missed,
Answered or Outgoing.
2.Use the up and down arrow keys to scroll through the records.
4.Press Details and then press +Contact.
5.Use the up and down arrow keys to switch between the name and number details for the new contact.
6.When the name and number are set as required, press Save

Voicemail
The MESSAGE button indicates new messages in the voicemail mailbox. The button remains lit until you play each new
message.

Checking messages
1.Press the MESSAGE button. Enter your voicemail password if requested and press Done.
2.The numbers shown next to Listen indicate the number of new, old and saved messages.
3.Highlight Listen and press Select.
4.Use the Up and Down arrow keys to highlight the messages that is New, Old or Saved, that you want to
listen to and press Select. The details of the first message of that type are displayed.
5.You can use the up and down arrow keys to scroll through the messages.
6.Use the soft keys to control the playback actions for the current message.
By default, messages are automatically deleted at a set time after being played. The delay depends on the particular
voicemail server, for example, 24 hours for embedded voicemail and 30 days for Voicemail Pro.
Voicemail On/Off
You can switch on or switch off the voicemail for your unanswered calls. This does not switch off your mailbox; you can
still play existing messages and use other functions.
1.Press the MESSAGE button. Enter your voicemail password if requested and press Done.
2.Use the up and down arrow keys to highlight Voicemail.
3.Press the Select soft key.
4.Press the On or Off soft key to change the setting.

– Select “Menu”

– Select “Personal Ringing”

– Select appropriate pattern

– Select “Save” button

Making a conference call

1. While active on a call, press the CONFERENCE button. The call is put on hold.
2. Call the person you want to add to a conference.
3. When they answer, if they want to join the conference press the CONFERENCE button again. If they do
not want to join the conference, press the DROP button. Then press the fast flashing green button.

Adding a person to a conference call

1. Press the HOLD button to put the conference on hold.
2. Call the person you want to add to a conference.
• When they answer, if they want to join the conference press the CONFERENCE button again.
• If they do not want to join the conference, press the DROP button. Then press the fast flashing
green button to rejoin the conference.

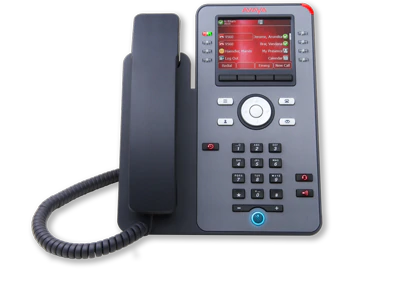
Avaya J Series General Usage

Making Calls
If you are not already on a call, just dial the number. The first available appearance button is used for the call. Alternatively, press another appearance button in order to hold your current call and to make a separate call. Set a Callback
If your call to an internal user is not answered, or if the status of the user is set to Do Not Disturb , you can press
CallBack and end the call attempt. When the user ends their current or next call, or disables their DND status, the
system calls you. When you answer, the system automatically makes another call attempt to the internal user. Calling a Person from the Contacts List
You can use any directory contact to make a call. You can also use the directory in any function where Dir is displayed. 1. Press the CONTACTS key. The directory menu is displayed. 2. Use the left/right cursor keys to select the type of directory entries you want to display; All, Personal (your own
personal directory contacts), External, Users, and Groups. 3. Use the up/down cursor keys to scroll through the list. Alternatively, you can use the number keypad to enter
the name for which you want to display matching entries. If you dial a name, press Clear to return to the full list. 4. To view more details of the highlighted name, press Details. To return to the directory, press List. 5. When the required entry is highlighted, press the Call button. Calling from Your Call Log
You can use your call history to make calls: 1. Press the CALL LOG button. Use the left/right cursor keys to select which calls are shown: All, Outgoing, Incoming or Missed. 2. Use the up/down cursor keys to scroll through the records. 3. Press Call to call the number displayed in the call record. Redialling a Previous Number
1. Press Redial. Use the up/down cursor keys to scroll through your most recent outgoing calls. 2. Press Call to call the number displayed in the call record.

Answering Calls
A slow flashing appearance button indicates an alerting call. This may also be accompanied by ringing and by the
message lamp flashing. If you are currently not on a call: · To quiet the ringing, press Ignore. The call will continue alerting visually. · To redirect the call to your mailbox, press To VM if shown. · To answer the call using the handset, lift the handset. · To answer the call handsfree, press the SPEAKER key. · To answer the call on a headset, press the HEADSET key. Once you have answered the call, you can switch between different talk modes: · To switch to using the handset, simply lift the handset. · To switch to handsfree, press the SPEAKER key. If you were using the handset you can now replace it. · To switch to headset mode, press the HEADSET key. If you were using the handset you can now replace it. · Pressing the call’s appearance key or any other appearance key will put the call on hold.
3
J169 Phone Quick Reference Guide Page 2
IP Office 04a (3/29/2018)
Answering Another Call
If you are already on a call, answering a new call automatically puts the existing call on hold. · To answer the call, press the appearance button. · Alternatively, using the up/down cursor keys, scroll the display to highlight the waiting call and select the action
you want to apply; Answer, To VM, Ignore or Drop. Diverting a Call to Voicemail
You can transfer directly to your voicemail mailbox any call targeted at you. 1. If the call is not the currently highlighted call on the display, use the up/down cursor keys to highlight it. 2. Press To VM to redirect the call to your mailbox.

Call Handling
Adjusting the Call Volume
You can adjust the volume of the incoming audio while you are on the call: 1. With the call connected, press the –/+ VOLUME key. 2. Use the + plus and – minus keys to adjust the volume. Note: The volume for the device currently in use (handset, headset, or speaker) is adjusted separately. Holding a Call
1. To put your current call on hold, press the Hold soft key or the call’s appearance button. 2. The held call will be indicated by its call appearance button with a fast-flashing green lamp. On phones with only a
single call appearance button (or icon), the phone displays “On-Hold” before the call information on the call’s
application line. 3. While held, the caller will hear music on hold. If your system does not have music on hold available, the caller will
hear double beep tones every few seconds. 4. You can scroll the display using the up and down cursor keys. Muting a Call
Muting a call stops the far end from hearing you although you can still hear the far end. 1. To activate mute, press the MUTE key. The button will be lit while mute is active. 2. To switch mute off, press the MUTE key again. Ending a Call
· The Drop button can be used to end the currently highlighted call. · If the call is on the phone’s speaker, the SPEAKER key is lit. Pressing the key again will end the call. · If the call is on the phone’s headset, the HEADSET key is lit. Pressing the key again will end the call. · If the call is on the phone’s handset, replacing the handset will end the call.

Conferencing
Starting a Conference
If you have a connected call and have held alternate calls, pressing Conf will start a conference with those held calls and
the connected call. Otherwise, to start a conference or to add another party to a conference: 1. Press Conf. Your current call is put on hold. 2. Dial the party that you want to add to the conference. 3. If they answer and want to join the call, press Conf again. 4. If they do not want to join or do not answer, press Drop and then press the appearance key of the held call.
J169 Phone Quick Reference Guide Page 3
IP Office 04a (3/29/2018)
Dropping/Muting Parties
While in a conference, press the Details key. Scroll through the list of callers in the conference and: · To drop a caller from the conference, highlight them and press Drop. · To mute a caller, highlight them and press Mute. Repeat this to unmute them. · To return to the call display, press Back.

Transferring Calls
You can transfer calls even if no call appearance buttons are available. 1. Press Transfer. The current call is put on hold. 2. Dial the number for the transfer. Alternatively, press Dir to select a destination from the directory, or press
Redial if applicable. · To complete a supervised transfer, press Complete after the call has been answered. · To complete an unsupervised transfer, press Complete while the call is still ringing. · If the transfer destination does not answer or does not want to accept the call, press Cancel. Transferring Calls to Voicemail
You can use the Message key to transfer a call to another user’s or group’s voicemail mailbox. 1. With a call connected, press the Message key. You can continue talking. 2. Dial the extension number of the user or group and press Select.

Redirecting Calls
Do Not Disturb
When you select ‘Do Not Disturb’, your calls are redirected to voicemail if available or otherwise hear busy tone. Calls to
any group of which you are a member are not presented to you. You can still use the phone to make outgoing calls. When
you go off-hook you will hear broken dial tone. 1. Press Features. Use the up/down cursor keys to highlight Call Settings. Press Select. 2. Select Do Not Disturb. 3. Press Change to change the setting. 4. Press Save to save the setting. Forward Unconditional
You can change your forward unconditional settings using the Features menu. 1. Press Features. Use the up/down cursor keys to highlight Forward. Press Select. 2. Use the up/down cursor keys to highlight Forward Unconditional. Press Select. · To switch on/off: Highlight Fwd Unconditional. Press On or Off. If no destination is currently set, the
display jumps to the destination field. · To select which calls: Highlight Call Type. Press Change and when the required option is displayed press
Save. Options are External Only, External and Group, Non Group Calls and All Calls. · To set the destination: Highlight Destination. Press Edit and enter the number required or press To VM to
forward to voicemail. Follow Me
You can redirect your calls temporarily to another extension. 1. Press Features. Use the up/down cursor keys to highlight Forward. Press Select. 2. Use the up/down cursor keys to highlight Follow Me To. Press Select. 3. Dial the number of another user or press Dir to select from the directory. Press Save.

Contacts
Adding a New Contact
You can add up to 100 personal directory contacts. This number is limited by the capacity of the telephone system
directory. If capacity is met, you will not be able to add new contacts. 1. Press the CONTACTS key. Use the left/right cursor keys to select your Personal directory. 2. To add a contact, press New. To edit a contact, highlight it and press Edit. · Use the up/down cursor keys to switch between number and name entry. · When the name and number have been entered as required, press Save. Add a Contact from Your Call History
You can add a name and number shown in your call history to your personal contacts. 1. Press the CALL LOG button. Use the left/right cursor keys to select which calls are shown: All, Outgoing, Incoming or Missed. 2. Use the up/down cursor keys to scroll through the records. 4. Press More and then press +Contact. 5. Use the up/down cursor keys to switch between the name and number details for the new contact. 6. When the name and number are set as required, press

Voicemail
Checking Messages
1. Press the MESSAGE button. Enter your voicemail password if requested and press Done. 2. The numbers shown next to Listen indicate the number of new, old and saved messages. 3. Highlight Listen and press Select. 4. Use the up/down cursor keys to highlight which messages (New, Old or Saved) that you want to listen to and
press Select. The details of the first message of that type are displayed. 5. You can use the up/down cursor keys to scroll through the messages. 6. Use the soft keys to control the playback actions for the current message. By default, messages are automatically deleted a set time after being played. The delay depends on the particular voicemail server (24 hours for embedded voicemail, 30 days for Voicemail Pro). Voicemail On/Off
You can control whether voicemail is used for your unanswered calls. This does not switch off your mailbox; you can still
play existing messages and use other functions. 1. Press the MESSAGE button. Enter your voicemail password if requested and press Done. 2. Use the up/down cursor keys to highlight Voicemail. 3. Press Change to switch between On or Off. 4. Press Save to save the change