Ericsson LG iPECS Phone System

The Ericsson-LG iPECS and eMG100 phone systems are so popular because they're feature rich but still maintain the ease of use that the LG brand is synonymous with. Your staff can learn the system in just minutes and you don't need a PhD to operate any of the Ericsson-LG handsets. For more detailed information about the various Ericsson-LG phone systems on offer please read below.

iPecs Quick Help

Need help on how to use your Ipecs Telephone system? below you will find a lint of frequently used items on your phone system, feel free to browse all items and contact us if you need any further assistance with your iPecs PABX.

Total Solutions IT are Albury Wodonga Local Ariatech Partner and so are qualified to help you with your iPecs System

iPecs Help is always just a phone call away 02 6061 4222.

iPecs Help

Creating New or Updating Contact Your iPECS Speed Dials via The Web Dashboard

In this article, we will explain how to update or create new speed dial contacts in your iPECS phone system via the web dashboard.

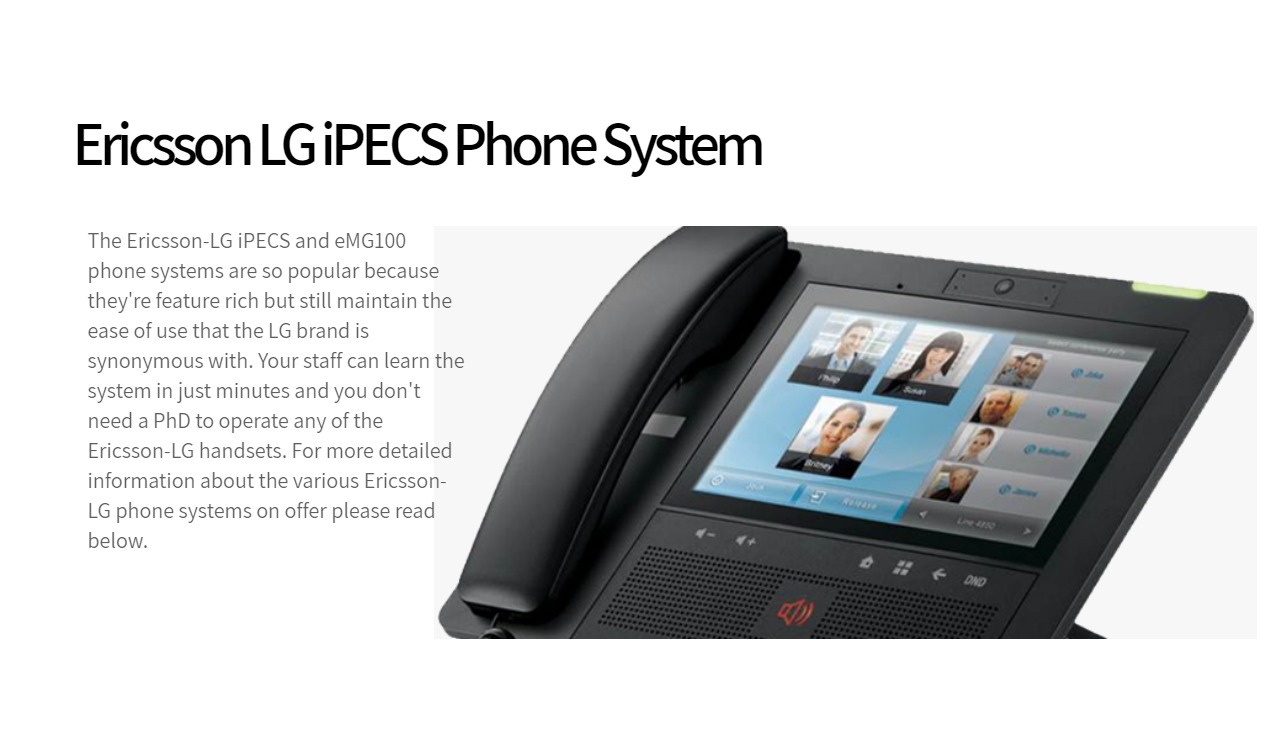
Just like your mobile phone, your Ericsson LG iPECS can store a directory of phone numbers in the system. Staff can then either search the directory on their phone handset by name or remember that your key customer’s speed dial code is ‘202’. When a team member then dials this speed dial, the iPECS phone system will then automatically call the number stored in the system.   Creating speed dials for your phone system can be a huge time saver for everyone in the business isn’t having to remember hundreds of numbers. Here at Total Solutions IT, we store our suppliers, key team members mobiles, and customers.

If you want to upload numbers to the iPECS Speed dial in bulk, you can by following this process. However, if you want to add a new speed dial, or update a contact, you can do this yourself via the iPECS web dashboard. Below we will go through that process.

To do the below process, you will need to have access to your iPECS web dashboard.

1. Login To Your iPECS Web Dashboard

First, you will need to login to your iPECS web dashboard. If you are connected to the same internet connection as your phone system the URL is likely to start with https://phone.companyname.com.au

Then enter your system username and password, and click the login button.

2. Search The Dial Range You Want To Edit

From the main dashboard of your iPECS web dashboard, you will see a menu on the left-hand side. Click the ‘System Data’ menu option, then click on the ‘System Speed Dial’ option from the submenu (you may have to scroll down to find it).

Setting Up A New Contact

  1. Tick the free slot
  2. Set the ‘Co Type’ to Loop
  3. Enter the full number of the contact you want to add, including the dialling code 02, 03, 04 etc.
  4. Enter the name you want to save the contact under in the phone system
  5. Click the Save button (top right)

Updating The Contact

  1. Tick the contact you want to update
  2. Click into the box and editing the details as you want.
  3. Click the Save button (top right)

Conclusion

In this article, we have shown you how to update or create a new speed dial in your iPECS phone system via the web dashboard.

If you need any help with your iPECS phone system, call our service department on 02 6061 4222.

How to Divert Calls

iPecs Help

If you Phone System is using PSTN lines from either Telstra or another carrier then you can take the following steps

To enable the call divert

1 Pick up appropriate phone line using call management buttons
2 to divert to a mobile press *73mobilenumber#
3 hang up the handset once you hear the confirmation message

To disable the call divert

1 Pick up appropriate phone line using call management buttons
2 to take the divert off press #73#
3 hang up the handset once you hear the confirmation message

If your phone system is connected to Telstra Business SIP Services

1 Open web Browser

2 Navigate to the following URL: https://portal.mycalling.telstra.com/login

3 Enter credentials

4 Select “Feature Packs”

5 Under “Business Continuity” select “Edit”

6 Choose number you wish to foward, and select assign

7 Select “SIP Truck ” from main page

8 under “Business Continuity” section, select all under “foward to” enter number to sent all calls to.

9 select apply

Updating your Phone System Greetings & Voicemail for Christmas

iPecs help

LG Ericsson EMG100 Phone Systems

*** IMPORTANT: If you have professional recordings already uploaded to your system YOU MUST CONTACT US FIRST before changing anything you these changes below may overwrite your day to day professional recordings. Call us on 02 6061 4222 ***

This method overwrites the current holiday message, so you will have to follow these steps in the new year to re-record your night message.

1 – Press the Trans/Pgn button
2 – Press 0 for attendant
3 – Enter password( its a combination of your extension number and password)
4 – Select option 6

Then enter one of the following codes

001 – Day Time message
002 – Night Time message
003 – Holiday Message

5 – Enter 1
6 – Press # to start the recording
7 – Press Hold/Save to save the message

8 – To place the phone system in to Day Mode/Night mode/Holiday Mode
9 – Press DND

1 – Day Mode
2 – Night Mode
3 – Holiday Message

10 – Press Hold/Save

Need IT Support? – Ask us about iPecs Networking Solutions

Make and Recieve calls via the Smart Phone UCS App

iPecs Help

Interested in Voicemail to Email? – Ask us about Microsoft 365 Intergration

iPecs 1000i Handset

Quick help video

iPecs 1000i Series Handsets

iPecs Help

To Make an Outside Call
• Lift Handset and dial 0 for next available line and dial number. (dial 9 for reception)
• Or just dial 0 and desired number and talk hands free/lift handset.
• Or repeat above but press desired line key.

To Answer a Call
• If Phone Ringing; Lift handset or press SPEAKER button for hands free
• If Phone Not Ringing; Lift handset and/or press flashing line button or PICKUP button (if pickup group programmed)

To Transfer a Call
• While on Call press TRANS/PGM button (FLASH button on Analogue)
• Dial the Station number
• Announce Call & Hang up
• Alternatively press pre-programmed flexible button, announce and hang up.

To Intercom
• Lift handset or press SPEAKER button
• Dial the Station number

To Place a Call On Hold
• Press the HOLD/SAVE button
• Once for system hold (all handsets have access to the call)
• Twice for exclusive hold (only pick up call from the originating handset)

To Page (All Call)
• Dial # 0 0 (internal and external) or
• Dial # 3 (internal only) or
• Dial # 5 (external only)
• Lift handset and wait for tone before speaking

Log Key
• Press the LOG button, scroll through last 100 dialled, received and missed numbers using the navigation buttons (12 & 24 button Handsets)
• Press SEND button to call number in log

To Park a Call
• Press TRANS/PGM button (FLASH button on Analogue)
• Dial Parking location number (601~610)
• Hang up or press SPEAKER button

To Retrieve Parked Call
• Lift handset on any Station (or press SPEAKER button)
• Dial Parking location number (601~610)

Callback Set
• Dial a busy Station or Outgoing Line
• Press CALLBK button
• Hang up (If Voice Mail used, hold to leave Message on Station)
• Once calling party or Outgoing Line is free your Station will ring
• Pickup to make call to Station or use Outgoing Line

Call Forward Set
• Dial 5 5 4
• Select number for call forward type
0. Remote Forward (If set by Technician)
1. Unconditional Forward
2. Busy Forward
3. No answer Forward
4. Busy/no answer Forward
5. Incoming line off-net
#. Cancel Forward
• After selection dial Station number (e.g. 100), Hunt Group number (e.g. 625 for VM), or Speed Bin number you wish to divert to (e.g. 200)

Cancel Call Forward
• Dial 5 5 4
• Then the # button

Set Intercom Answer Mode
• This determines how your Station will ring when receiving an intercom call
• Press TRANS/PGM button
• Dial 1 3 and select
1. for Hands free (Auto answer after a BEEP tone)
2. for Tone ring
3. for Privacy announce (Auto Answer but you must pick-up the handset to talk)
• Press HOLD/SAVE button or the OK button

Mute
• Press MUTE button to switch off the microphone
• Press MUTE button to switch on the microphone (MUTE changes to SPEAK on 16 &
24 button handsets)

Group Pick-up
• Press PICKUP button or dial **
• Lift any handset to talk or talk handsfree
• This will answer the longest ringing call and will only pickup calls that are programmed in your group

Differential Ring for Individual Station
• To set different Internal ring
• Press TRANS/PGM button
• Dial 1 1
• Dial 1 to 8 to choose the ring tone
• Press HOLD/SAVE button or OK
• To set different External ring
• Press TRANS/PGM button
• Dial 1 2
• Dial 1 to 8 to choose the ring tone
• Press HOLD/SAVE button or OK

Program Speed Dial
• Press DIR button
• Press SPEED button
• Press ADD button
• Prompted to enter speed bin No (XXX) eg 200
• Dial X X X eg 200
• Prompted to Enter CO-BTN/DIGIT
• Dial 0 for outside line
• Enter the phone number you wish to store
• Press HOLD/SAVE button
• Enter in dial by name label using number chart on last page
• Press HOLD/SAVE button
• Press SPEAKER button to exit
#Note System Speed Dials range from 200~999 and Station Speed Dial range from 00~19
System Speed Dials programmed from attendant phone

Use Speed dial
• Press DIR button
• Select corresponding number for phone book
1. Private directory
2. Public directory
3. View station name
• Scroll to selected entry
• Press SEND to call

Station Name Program
• Press TRANS/PGM button
• Dial 7 4 (or 0 7 1 from system attendant + Station Number)
• Enter in Station name label using number chart on last page
• Press HOLD/SAVE button when done

Global Station Name Program (System Attendant Only)
• Press TRANS/PGM button•
• Dial 0 7 1
• Enter the station number you are programming
• Enter in Station name label using number chart on last page
• Press HOLD/SAVE button when done

Use SPEED Dial by name and Station Name
• Press DIR button
• Select corresponding number for the Phone Book
1. Private Directory
2. Public Directory
3. View Station Name Select Name
Press SEND button

Music (On & Off)
• Press TRANS/PGM button •
• Dial 7 3
• Select background music channel by dialling 0-3 (Usually 1 for Music on
• Hold source, 0 turns music off)
• Press HOLD/SAVE button

Making a Conference Call
• Dial first party
• Press CONF button
• Press next party (line or extension)
• Continue above steps until all parties are connected
• Press CONF button twice to commence conference call
#Note you must have a CONF button programmed. Number of members are limited to the number of exchange lines on the system. All lines used are tied up for the duration of the Conference call.

Change Headset/Speaker Mode
• Press TRANS/PGM button •
• Dial 6 1 (Change Speaker key to headset key)
• Select 1 (on) or 0 (off)
• Press HOLD/SAVE or OK button
• If headset jack on the side press MENU & dial 2 5
• Scroll up or down the set on or off
• Press HOLD/SAVE or OK button

Do Not Disturb
• Press DND button. Or,
• Dial 5 5 3
• Repeat to remove

Change System Date and Time (only at the system attendant phone)
• Press TRANS/PGM button•
• Dial 0 4 1
• Prompts for date entry (MM/DD/YY) •
• Dial date e.g. 120108 (1st December 2008)
• Press HOLD/SAVE or OK button
• Prompts time entry (HH:MM)
• Dial time e.g. 1315 (01:15pm)
• Press HOLD/SAVE or OK button

Program Flexible Button
• Press TRANS/PGM button
• Press flexible button to program
• Dial feature e.g. Station No. (200), group number (VM 626) or desired codes (list below)
• Press HOLD/SAVE button
• Press SPEAKER button to exit

To Erase Flexible Button
• Press TRANS/PGM button
• Press flexible button to program
• Press HOLD/SAVE button

Button Codes for flexible button programming
1. CONF – TRANS/PGM 9 1 2. CALLBK – TRANS/PGM 9 2
3. DND – TRANS/PGM 9 3
4. REDIAL – TRANS/PGM 9 7
5. MUTE – TRANS/PGM 9 5
Example: CONF button. Press TRANS/PGM then flex key to program. Press TRANS/PGM again followed by 91 then dial HOLD/SAVE to save.

Voicemail

iPecs Help

Voice Mail (VSF)
• Dial preconfigured Group number for Voice Mail (Typically 625)
• Prompted for your Password
• Enter 4 digit password (Default is extension number then *, i.e. 100*)
• Follow the voice prompts to navigate through voice mail, mailbox configuration, voice mail greeting, or password etc.

Remote access to Voice Mail
• Once your Voice Mail has answered your call and during your greeting Dial the # key
• Your are then prompted for your password
• Enter 4 digit password (Default is extension number then *, i.e. 100*)
• Follow the voice prompts to navigate through voice mail, mailbox configuration, voice mail greeting, or password etc.

Number and Letter Code Chart for Select series and iPECS handsets
When required to enter characters (e.g., station name or speed dial name), press the dial pad number corresponding to the alpha character desired. Press SPEED or BACK softkey to delete incorrect characters.
e.g. For ‘R’ dial 72, for a ‘space’ dial *1, for ‘V’ dial 83 etc.
Q – 11
A – 21
D – 31
Z – 12
B – 22
E – 32
. – 13
C – 23
F – 33
1 – 10
2 – 20
3 – 30
G – 41
J – 51
M – 61
H – 42
K – 52
N – 62
I – 43
L – 53
0 – 63
4 – 40
5 – 50
6 – 60
P – 71
T – 81
W – 91
R – 72
U – 82
X – 92
S – 73
V – 83
Y – 93
Q – 7*
Z – 9#
7 – 70
8 – 80
9 – 90
*1 – Blank *2 – :
*3 – ,
0-00
#
#Note Some program codes, Voice mail number, may be changed with your system depending on the configuration. Other functions require preconfiguration by your technician.

iPecs 9200 Handset

Quick help video

iPecs 9000 Series Handsets

iPecs Help

To Make an Outside Call
• Lift Handset and dial 0 for next available line and dial number. (dial 9 for reception)
• Or just dial 0 and desired number and talk hands free/lift handset.
• Or repeat above but press desired line key.

To Answer a Call
• If Phone Ringing; Lift handset or press SPEAKER button for hands free
• If Phone Not Ringing; Lift handset and/or press flashing line button or PICKUP button (if pickup group programmed)

To Transfer a Call
• While on Call press TRANS/PGM button (FLASH button on Analogue)
• Dial the Station number
• Announce Call & Hang up
• Alternatively press pre-programmed flexible button, announce and hang up.

To Intercom
• Lift handset or press SPEAKER button
• Dial the Station number

To Place a Call On Hold
• Press the HOLD/SAVE button
• Once for system hold (all handsets have access to the call)
• Twice for exclusive hold (only pick up call from the originating handset)

To Page (All Call)
• Dial # 0 0 (internal and external) or
• Dial # 3 (internal only) or
• Dial # 5 (external only)
• Lift handset and wait for tone before speaking

Log Key
• Press the LOG button, scroll through last 100 dialled, received and missed numbers using the navigation buttons (12 & 24 button Handsets)
• Press SEND button to call number in log

To Park a Call
• Press TRANS/PGM button (FLASH button on Analogue)
• Dial Parking location number (601~610)
• Hang up or press SPEAKER button

To Retrieve Parked Call
• Lift handset on any Station (or press SPEAKER button)
• Dial Parking location number (601~610)

Callback Set
• Dial a busy Station or Outgoing Line
• Press CALLBK button
• Hang up (If Voice Mail used, hold to leave Message on Station)
• Once calling party or Outgoing Line is free your Station will ring
• Pickup to make call to Station or use Outgoing Line

Call Forward Set
• Dial 5 5 4
• Select number for call forward type
0. Remote Forward (If set by Technician)
1. Unconditional Forward
2. Busy Forward
3. No answer Forward
4. Busy/no answer Forward
5. Incoming line off-net
#. Cancel Forward
• After selection dial Station number (e.g. 100), Hunt Group number (e.g. 625 for VM), or Speed Bin number you wish to divert to (e.g. 200)

Cancel Call Forward
• Dial 5 5 4
• Then the # button

Set Intercom Answer Mode
• This determines how your Station will ring when receiving an intercom call
• Press TRANS/PGM button
• Dial 1 3 and select
1. for Hands free (Auto answer after a BEEP tone)
2. for Tone ring
3. for Privacy announce (Auto Answer but you must pick-up the handset to talk)
• Press HOLD/SAVE button or the OK button

Mute
• Press MUTE button to switch off the microphone
• Press MUTE button to switch on the microphone (MUTE changes to SPEAK on 16 &
24 button handsets)

Group Pick-up
• Press PICKUP button or dial **
• Lift any handset to talk or talk handsfree
• This will answer the longest ringing call and will only pickup calls that are programmed in your group

Differential Ring for Individual Station
• To set different Internal ring
• Press TRANS/PGM button
• Dial 1 1
• Dial 1 to 8 to choose the ring tone
• Press HOLD/SAVE button or OK
• To set different External ring
• Press TRANS/PGM button
• Dial 1 2
• Dial 1 to 8 to choose the ring tone
• Press HOLD/SAVE button or OK

Program Speed Dial
• Press DIR button
• Press SPEED button
• Press ADD button
• Prompted to enter speed bin No (XXX) eg 200
• Dial X X X eg 200
• Prompted to Enter CO-BTN/DIGIT
• Dial 0 for outside line
• Enter the phone number you wish to store
• Press HOLD/SAVE button
• Enter in dial by name label using number chart on last page
• Press HOLD/SAVE button
• Press SPEAKER button to exit
#Note System Speed Dials range from 200~999 and Station Speed Dial range from 00~19
System Speed Dials programmed from attendant phone

Use Speed dial
• Press DIR button
• Select corresponding number for phone book
1. Private directory
2. Public directory
3. View station name
• Scroll to selected entry
• Press SEND to call

Station Name Program
• Press TRANS/PGM button
• Dial 7 4 (or 0 7 1 from system attendant + Station Number)
• Enter in Station name label using number chart on last page
• Press HOLD/SAVE button when done

Global Station Name Program (System Attendant Only)
• Press TRANS/PGM button•
• Dial 0 7 1
• Enter the station number you are programming
• Enter in Station name label using number chart on last page
• Press HOLD/SAVE button when done

Use SPEED Dial by name and Station Name
• Press DIR button
• Select corresponding number for the Phone Book
1. Private Directory
2. Public Directory
3. View Station Name Select Name
Press SEND button

Music (On & Off)
• Press TRANS/PGM button •
• Dial 7 3
• Select background music channel by dialling 0-3 (Usually 1 for Music on
• Hold source, 0 turns music off)
• Press HOLD/SAVE button

Making a Conference Call
• Dial first party
• Press CONF button
• Press next party (line or extension)
• Continue above steps until all parties are connected
• Press CONF button twice to commence conference call
#Note you must have a CONF button programmed. Number of members are limited to the number of exchange lines on the system. All lines used are tied up for the duration of the Conference call.

Change Headset/Speaker Mode
• Press TRANS/PGM button •
• Dial 6 1 (Change Speaker key to headset key)
• Select 1 (on) or 0 (off)
• Press HOLD/SAVE or OK button
• If headset jack on the side press MENU & dial 2 5
• Scroll up or down the set on or off
• Press HOLD/SAVE or OK button

Do Not Disturb
• Press DND button. Or,
• Dial 5 5 3
• Repeat to remove

Change System Date and Time (only at the system attendant phone)
• Press TRANS/PGM button•
• Dial 0 4 1
• Prompts for date entry (MM/DD/YY) •
• Dial date e.g. 120108 (1st December 2008)
• Press HOLD/SAVE or OK button
• Prompts time entry (HH:MM)
• Dial time e.g. 1315 (01:15pm)
• Press HOLD/SAVE or OK button

Program Flexible Button
• Press TRANS/PGM button
• Press flexible button to program
• Dial feature e.g. Station No. (200), group number (VM 626) or desired codes (list below)
• Press HOLD/SAVE button
• Press SPEAKER button to exit

To Erase Flexible Button
• Press TRANS/PGM button
• Press flexible button to program
• Press HOLD/SAVE button

Button Codes for flexible button programming
1. CONF – TRANS/PGM 9 1 2. CALLBK – TRANS/PGM 9 2
3. DND – TRANS/PGM 9 3
4. REDIAL – TRANS/PGM 9 7
5. MUTE – TRANS/PGM 9 5
Example: CONF button. Press TRANS/PGM then flex key to program. Press TRANS/PGM again followed by 91 then dial HOLD/SAVE to save.

iPecs 8000 Series Handsets

iPecs Help

To Make an Outside Call
• Lift Handset and dial 0 for next available line and dial number. (dial 9 for reception)
• Or just dial 0 and desired number and talk hands free/lift handset.
• Or repeat above but press desired line key.

To Answer a Call
• If Phone Ringing; Lift handset or press SPEAKER button for hands free
• If Phone Not Ringing; Lift handset and/or press flashing line button or PICKUP button (if pickup group programmed)

To Transfer a Call
• While on Call press TRANS/PGM button (FLASH button on Analogue)
• Dial the Station number
• Announce Call & Hang up
• Alternatively press pre-programmed flexible button, announce and hang up.

To Intercom
• Lift handset or press SPEAKER button
• Dial the Station number

To Place a Call On Hold
• Press the HOLD/SAVE button
• Once for system hold (all handsets have access to the call)
• Twice for exclusive hold (only pick up call from the originating handset)

To Page (All Call)
• Dial # 0 0 (internal and external) or
• Dial # 3 (internal only) or
• Dial # 5 (external only)
• Lift handset and wait for tone before speaking

Log Key
• Press the LOG button, scroll through last 100 dialled, received and missed numbers using the navigation buttons (12 & 24 button Handsets)
• Press SEND button to call number in log

To Park a Call
• Press TRANS/PGM button (FLASH button on Analogue)
• Dial Parking location number (601~610)
• Hang up or press SPEAKER button

To Retrieve Parked Call
• Lift handset on any Station (or press SPEAKER button)
• Dial Parking location number (601~610)

Callback Set
• Dial a busy Station or Outgoing Line
• Press CALLBK button
• Hang up (If Voice Mail used, hold to leave Message on Station)
• Once calling party or Outgoing Line is free your Station will ring
• Pickup to make call to Station or use Outgoing Line

Call Forward Set
• Dial 5 5 4
• Select number for call forward type
0. Remote Forward (If set by Technician)
1. Unconditional Forward
2. Busy Forward
3. No answer Forward
4. Busy/no answer Forward
5. Incoming line off-net
#. Cancel Forward
• After selection dial Station number (e.g. 100), Hunt Group number (e.g. 625 for VM), or Speed Bin number you wish to divert to (e.g. 200)

Cancel Call Forward
• Dial 5 5 4
• Then the # button

Set Intercom Answer Mode
• This determines how your Station will ring when receiving an intercom call
• Press TRANS/PGM button
• Dial 1 3 and select
1. for Hands free (Auto answer after a BEEP tone)
2. for Tone ring
3. for Privacy announce (Auto Answer but you must pick-up the handset to talk)
• Press HOLD/SAVE button or the OK button

Mute
• Press MUTE button to switch off the microphone
• Press MUTE button to switch on the microphone (MUTE changes to SPEAK on 16 &
24 button handsets)

Group Pick-up
• Press PICKUP button or dial **
• Lift any handset to talk or talk handsfree
• This will answer the longest ringing call and will only pickup calls that are programmed in your group

Differential Ring for Individual Station
• To set different Internal ring
• Press TRANS/PGM button
• Dial 1 1
• Dial 1 to 8 to choose the ring tone
• Press HOLD/SAVE button or OK
• To set different External ring
• Press TRANS/PGM button
• Dial 1 2
• Dial 1 to 8 to choose the ring tone
• Press HOLD/SAVE button or OK

Program Speed Dial
• Press DIR button
• Press SPEED button
• Press ADD button
• Prompted to enter speed bin No (XXX) eg 200
• Dial X X X eg 200
• Prompted to Enter CO-BTN/DIGIT
• Dial 0 for outside line
• Enter the phone number you wish to store
• Press HOLD/SAVE button
• Enter in dial by name label using number chart on last page
• Press HOLD/SAVE button
• Press SPEAKER button to exit
#Note System Speed Dials range from 200~999 and Station Speed Dial range from 00~19
System Speed Dials programmed from attendant phone

Use Speed dial
• Press DIR button
• Select corresponding number for phone book
1. Private directory
2. Public directory
3. View station name
• Scroll to selected entry
• Press SEND to call

Station Name Program
• Press TRANS/PGM button
• Dial 7 4 (or 0 7 1 from system attendant + Station Number)
• Enter in Station name label using number chart on last page
• Press HOLD/SAVE button when done

Global Station Name Program (System Attendant Only)
• Press TRANS/PGM button•
• Dial 0 7 1
• Enter the station number you are programming
• Enter in Station name label using number chart on last page
• Press HOLD/SAVE button when done

Use SPEED Dial by name and Station Name
• Press DIR button
• Select corresponding number for the Phone Book
1. Private Directory
2. Public Directory
3. View Station Name Select Name
Press SEND button

Music (On & Off)
• Press TRANS/PGM button •
• Dial 7 3
• Select background music channel by dialling 0-3 (Usually 1 for Music on
• Hold source, 0 turns music off)
• Press HOLD/SAVE button

Making a Conference Call
• Dial first party
• Press CONF button
• Press next party (line or extension)
• Continue above steps until all parties are connected
• Press CONF button twice to commence conference call
#Note you must have a CONF button programmed. Number of members are limited to the number of exchange lines on the system. All lines used are tied up for the duration of the Conference call.

Change Headset/Speaker Mode
• Press TRANS/PGM button •
• Dial 6 1 (Change Speaker key to headset key)
• Select 1 (on) or 0 (off)
• Press HOLD/SAVE or OK button
• If headset jack on the side press MENU & dial 2 5
• Scroll up or down the set on or off
• Press HOLD/SAVE or OK button

Do Not Disturb
• Press DND button. Or,
• Dial 5 5 3
• Repeat to remove

Change System Date and Time (only at the system attendant phone)
• Press TRANS/PGM button•
• Dial 0 4 1
• Prompts for date entry (MM/DD/YY) •
• Dial date e.g. 120108 (1st December 2008)
• Press HOLD/SAVE or OK button
• Prompts time entry (HH:MM)
• Dial time e.g. 1315 (01:15pm)
• Press HOLD/SAVE or OK button

Program Flexible Button
• Press TRANS/PGM button
• Press flexible button to program
• Dial feature e.g. Station No. (200), group number (VM 626) or desired codes (list below)
• Press HOLD/SAVE button
• Press SPEAKER button to exit

To Erase Flexible Button
• Press TRANS/PGM button
• Press flexible button to program
• Press HOLD/SAVE button

Button Codes for flexible button programming
1. CONF – TRANS/PGM 9 1 2. CALLBK – TRANS/PGM 9 2
3. DND – TRANS/PGM 9 3
4. REDIAL – TRANS/PGM 9 7
5. MUTE – TRANS/PGM 9 5
Example: CONF button. Press TRANS/PGM then flex key to program. Press TRANS/PGM again followed by 91 then dial HOLD/SAVE to save.

Voicemail

iPecs Help

Voice Mail (VSF)
• Dial preconfigured Group number for Voice Mail (Typically 625)
• Prompted for your Password
• Enter 4 digit password (Default is extension number then *, i.e. 100*)
• Follow the voice prompts to navigate through voice mail, mailbox configuration, voice mail greeting, or password etc.

Remote access to Voice Mail
• Once your Voice Mail has answered your call and during your greeting Dial the # key
• Your are then prompted for your password
• Enter 4 digit password (Default is extension number then *, i.e. 100*)
• Follow the voice prompts to navigate through voice mail, mailbox configuration, voice mail greeting, or password etc.

Number and Letter Code Chart for Select series and iPECS handsets
When required to enter characters (e.g., station name or speed dial name), press the dial pad number corresponding to the alpha character desired. Press SPEED or BACK softkey to delete incorrect characters.
e.g. For ‘R’ dial 72, for a ‘space’ dial *1, for ‘V’ dial 83 etc.
Q – 11
A – 21
D – 31
Z – 12
B – 22
E – 32
. – 13
C – 23
F – 33
1 – 10
2 – 20
3 – 30
G – 41
J – 51
M – 61
H – 42
K – 52
N – 62
I – 43
L – 53
0 – 63
4 – 40
5 – 50
6 – 60
P – 71
T – 81
W – 91
R – 72
U – 82
X – 92
S – 73
V – 83
Y – 93
Q – 7*
Z – 9#
7 – 70
8 – 80
9 – 90
*1 – Blank *2 – :
*3 – ,
0-00
#
#Note Some program codes, Voice mail number, may be changed with your system depending on the configuration. Other functions require preconfiguration by your technician.